ES6.2.3(3节点)数据迁移到ES7.4.1(5节点)
目标
现在有一个ES集群(3节点,3个节点既是master也是data),存储的数据约460G。现在需要升级ES版本为7.4.1,新集群采用12个节点(4个master,8个data节点)
演练
- 由于迁移的数据量蛮大的,基本不可能采用github的elasticdump工具,也不能采用es自带的数据备份恢复功能。
- 允许es停机(这是很重要的一点)
所以在演练中,采用下面的演练步骤
搭建ES6.2.3的3节点集群
由于es6.2.3版本docker官网没有现成的镜像,所以这里采用直接安装的方式。
es的配置和线上环境保持一样,稍微修改下端口什么的(因为在一台机子上),3个节点既是master也是data节点
具体配置如下:
cluster.name: es-cluster
node.name: node6.2.3-3
#node.attr.rack: r1
node.master: true
#cluster.initial_master_nodes: node-172.29.130.2

node.data: true
path.data: data
path.logs: logs
network.host: 0.0.0.0
http.port: 9202
transport.tcp.port: 9302
discovery.zen.ping.unicast.hosts: ["127.0.0.1:9300","127.0.0.1:9301","127.0.0.1:9302"]
discovery.zen.minimum_master_nodes: 2
#bootstrap.memory_lock: true
#gateway.recover_after_nodes: 3
#action.destructive_requires_name: true
# 如果没有足够大的内存,因为了elasticsearch引用文件,系统内存会大量用于系统cache(linux的内存管理机制)。
# 由于系统cache释放缓慢,而导致这个过程非常长,这有可能使你的节点GC非常频繁,从而导致集群不稳定。
# 建议把bootstrap.mlockall设为true
#bootstrap.mlockall: true
http.cors.enabled: true
http.cors.allow-origin: "*"

===========================================

cluster.name: es-cluster
node.name: node6.2.3-1
#node.attr.rack: r1
node.master: true
#cluster.initial_master_nodes: node-172.29.130.2

node.data: true
path.data: data
path.logs: logs
network.host: 0.0.0.0
http.port: 9200
transport.tcp.port: 9300
discovery.zen.ping.unicast.hosts: ["127.0.0.1:9300","127.0.0.1:9301","127.0.0.1:9302"]
discovery.zen.minimum_master_nodes: 2
#bootstrap.memory_lock: true
#gateway.recover_after_nodes: 3
#action.destructive_requires_name: true
# 如果没有足够大的内存,因为了elasticsearch引用文件,系统内存会大量用于系统cache(linux的内存管理机制)。
# 由于系统cache释放缓慢,而导致这个过程非常长,这有可能使你的节点GC非常频繁,从而导致集群不稳定。
# 建议把bootstrap.mlockall设为true
#bootstrap.mlockall: true
http.cors.enabled: true
http.cors.allow-origin: "*"

===========================================

cluster.name: es-cluster
node.name: node6.2.3-2
#node.attr.rack: r1
node.master: true
#cluster.initial_master_nodes: node-172.29.130.2

node.data: true
path.data: data
path.logs: logs
network.host: 0.0.0.0
http.port: 9201
transport.tcp.port: 9301
discovery.zen.ping.unicast.hosts: ["127.0.0.1:9300","127.0.0.1:9301","127.0.0.1:9302"]
discovery.zen.minimum_master_nodes: 2
#bootstrap.memory_lock: true
#gateway.recover_after_nodes: 3
#action.destructive_requires_name: true
# 如果没有足够大的内存,因为了elasticsearch引用文件,系统内存会大量用于系统cache(linux的内存管理机制)。
# 由于系统cache释放缓慢,而导致这个过程非常长,这有可能使你的节点GC非常频繁,从而导致集群不稳定。
# 建议把bootstrap.mlockall设为true
#bootstrap.mlockall: true
http.cors.enabled: true
http.cors.allow-origin: "*"
写入6G测试数据
这里采用es官方的压测工具esrally进行写入数据操作,采用的数据是esrally官方提供的geonames数据集。
esrally --pipeline=benchmark-only --target-hosts=127.0.0.1:9200 --track=geonames
这里测试默认情况不仅会测试数据写入,还有其他测试,所以可以根据自己情况修改track.json文件,删除不必要的challenge和operations
写入完成后记录集群信息:

搭建ES7.4.1的5节点集群
为了模拟真实的新集群,这里采用1个master,4个data节点的方式进行部署,同时采用docker方式。具体配置如下:
master:


# 这两个配置都写master节点的ip
cluster.initial_master_nodes: ["172.18.12.2"]
discovery.seed_hosts: ["172.18.12.2","172.18.12.6","172.18.12.7","172.18.12.8","172.18.12.9"]

# 节点名称,其余两个节点分别为node-ip
# 节点名称以node-开头,以当前节点IP结尾
node.name: master_172.18.12.2

# 绑定的ip地址
network.host: 172.18.12.2

# 集群的名称
cluster.name: es-cluster-new

#node.attr.rack: r1

# 指定该节点是否有资格被选举成为master节点,默认是true,es是默认集群中的第一台机器为master,如果这台机挂了就会重新选举master
node.master: true

# 允许该节点存储数据(默认开启)
node.data: false

# 索引数据的存储路径
path.data: /opt/es/data

# 日志文件的存储路径
path.logs: /opt/es/logs

# 正式部署需要设置为true来锁住内存。因为内存交换到磁盘对服务器性能来说是致命的,当jvm开始swapping时es的效率会降低,所以要保证它不swap
# bootstrap.memory_lock: true

# 设置对外服务的http端口,默认为9200
http.port: 9200

# 设置节点间交互的tcp端口,默认是9300
transport.tcp.port: 9300

# 如果没有足够大的内存,因为了elasticsearch引用文件,系统内存会大量用于系统cache(linux的内存管理机制)。
# 由于系统cache释放缓慢,而导致这个过程非常长,这有可能使你的节点GC非常频繁,从而导致集群不稳定。
# 建议把bootstrap.mlockall设为true
# bootstrap.mlockall: true
discovery.zen.minimum_master_nodes: 1

# 开启跨域访问
http.cors.enabled: true
http.cors.allow-origin: "*"

==================================================

data1:


# 这两个配置都写master节点的ip
cluster.initial_master_nodes: ["172.18.12.2"]
discovery.seed_hosts: ["172.18.12.2","172.18.12.6","172.18.12.7","172.18.12.8","172.18.12.9"]

# 节点名称,其余两个节点分别为node-ip
# 节点名称以node-开头,以当前节点IP结尾
node.name: datanode_172.18.12.6

# 绑定的ip地址
network.host: 172.18.12.6

# 集群的名称
cluster.name: es-cluster-new

#node.attr.rack: r1

# 指定该节点是否有资格被选举成为master节点,默认是true,es是默认集群中的第一台机器为master,如果这台机挂了就会重新选举master
node.master: false

# 允许该节点存储数据(默认开启)
node.data: true

# 索引数据的存储路径
path.data: /opt/es/data

# 日志文件的存储路径
path.logs: /opt/es/logs

# 正式部署需要设置为true来锁住内存。因为内存交换到磁盘对服务器性能来说是致命的,当jvm开始swapping时es的效率会降低,所以要保证它不swap
# bootstrap.memory_lock: true

# 设置对外服务的http端口,默认为9200
http.port: 9200

# 设置节点间交互的tcp端口,默认是9300
transport.tcp.port: 9300

# 如果没有足够大的内存,因为了elasticsearch引用文件,系统内存会大量用于系统cache(linux的内存管理机制)。
# 由于系统cache释放缓慢,而导致这个过程非常长,这有可能使你的节点GC非常频繁,从而导致集群不稳定。
# 建议把bootstrap.mlockall设为true
# bootstrap.mlockall: true
discovery.zen.minimum_master_nodes: 1

# 开启跨域访问
http.cors.enabled: true
http.cors.allow-origin: "*"


======================================================

data2:


# 这两个配置都写master节点的ip
cluster.initial_master_nodes: ["172.18.12.2"]
discovery.seed_hosts: ["172.18.12.2","172.18.12.6","172.18.12.7","172.18.12.8","172.18.12.9"]

# 节点名称,其余两个节点分别为node-ip
# 节点名称以node-开头,以当前节点IP结尾
node.name: datanode_172.18.12.7

# 绑定的ip地址
network.host: 172.18.12.7

# 集群的名称
cluster.name: es-cluster-new

#node.attr.rack: r1

# 指定该节点是否有资格被选举成为master节点,默认是true,es是默认集群中的第一台机器为master,如果这台机挂了就会重新选举master
node.master: false

# 允许该节点存储数据(默认开启)
node.data: true

# 索引数据的存储路径
path.data: /opt/es/data

# 日志文件的存储路径
path.logs: /opt/es/logs

# 正式部署需要设置为true来锁住内存。因为内存交换到磁盘对服务器性能来说是致命的,当jvm开始swapping时es的效率会降低,所以要保证它不swap
# bootstrap.memory_lock: true

# 设置对外服务的http端口,默认为9200
http.port: 9200

# 设置节点间交互的tcp端口,默认是9300
transport.tcp.port: 9300

# 如果没有足够大的内存,因为了elasticsearch引用文件,系统内存会大量用于系统cache(linux的内存管理机制)。
# 由于系统cache释放缓慢,而导致这个过程非常长,这有可能使你的节点GC非常频繁,从而导致集群不稳定。
# 建议把bootstrap.mlockall设为true
# bootstrap.mlockall: true
discovery.zen.minimum_master_nodes: 1

# 开启跨域访问
http.cors.enabled: true
http.cors.allow-origin: "*"

======================================================

data3:


# 这两个配置都写master节点的ip
cluster.initial_master_nodes: ["172.18.12.2"]
discovery.seed_hosts: ["172.18.12.2","172.18.12.6","172.18.12.7","172.18.12.8","172.18.12.9"]

# 节点名称,其余两个节点分别为node-ip
# 节点名称以node-开头,以当前节点IP结尾
node.name: datanode_172.18.12.8

# 绑定的ip地址
network.host: 172.18.12.8

# 集群的名称
cluster.name: es-cluster-new

#node.attr.rack: r1

# 指定该节点是否有资格被选举成为master节点,默认是true,es是默认集群中的第一台机器为master,如果这台机挂了就会重新选举master
node.master: false

# 允许该节点存储数据(默认开启)
node.data: true

# 索引数据的存储路径
path.data: /opt/es/data

# 日志文件的存储路径
path.logs: /opt/es/logs

# 正式部署需要设置为true来锁住内存。因为内存交换到磁盘对服务器性能来说是致命的,当jvm开始swapping时es的效率会降低,所以要保证它不swap
# bootstrap.memory_lock: true

# 设置对外服务的http端口,默认为9200
http.port: 9200

# 设置节点间交互的tcp端口,默认是9300
transport.tcp.port: 9300

# 如果没有足够大的内存,因为了elasticsearch引用文件,系统内存会大量用于系统cache(linux的内存管理机制)。
# 由于系统cache释放缓慢,而导致这个过程非常长,这有可能使你的节点GC非常频繁,从而导致集群不稳定。
# 建议把bootstrap.mlockall设为true
# bootstrap.mlockall: true
discovery.zen.minimum_master_nodes: 1

# 开启跨域访问
http.cors.enabled: true
http.cors.allow-origin: "*"

======================================================

data4:


# 这两个配置都写master节点的ip
cluster.initial_master_nodes: ["172.18.12.2"]
discovery.seed_hosts: ["172.18.12.2","172.18.12.6","172.18.12.7","172.18.12.8","172.18.12.9"]

# 节点名称,其余两个节点分别为node-ip
# 节点名称以node-开头,以当前节点IP结尾
node.name: datanode_172.18.12.9

# 绑定的ip地址
network.host: 172.18.12.9

# 集群的名称
cluster.name: es-cluster-new

#node.attr.rack: r1

# 指定该节点是否有资格被选举成为master节点,默认是true,es是默认集群中的第一台机器为master,如果这台机挂了就会重新选举master
node.master: false

# 允许该节点存储数据(默认开启)
node.data: true

# 索引数据的存储路径
path.data: /opt/es/data

# 日志文件的存储路径
path.logs: /opt/es/logs

# 正式部署需要设置为true来锁住内存。因为内存交换到磁盘对服务器性能来说是致命的,当jvm开始swapping时es的效率会降低,所以要保证它不swap
# bootstrap.memory_lock: true

# 设置对外服务的http端口,默认为9200
http.port: 9200

# 设置节点间交互的tcp端口,默认是9300
transport.tcp.port: 9300

# 如果没有足够大的内存,因为了elasticsearch引用文件,系统内存会大量用于系统cache(linux的内存管理机制)。
# 由于系统cache释放缓慢,而导致这个过程非常长,这有可能使你的节点GC非常频繁,从而导致集群不稳定。
# 建议把bootstrap.mlockall设为true
# bootstrap.mlockall: true
discovery.zen.minimum_master_nodes: 1

# 开启跨域访问
http.cors.enabled: true
http.cors.allow-origin: "*"
配置好了后,可以先启动一下看看是否正常,先不拷贝数据,我这里之前已经测试过了。
其中一个启动命令如下:
docker run -d -P -h node172.18.12.7 --name node172.18.12.7 --network=mynet --ip=172.18.12.7 -v ~/Desktop/es-cluster/node172.18.12.7/elasticsearch.yml:/usr/share/elasticsearch/config/elasticsearch.yml -v ~/Desktop/es-cluster/node172.18.12.7/es:/opt/es -p 32777:9200 elasticsearch:7.4.1

拷贝物理文件到新集群
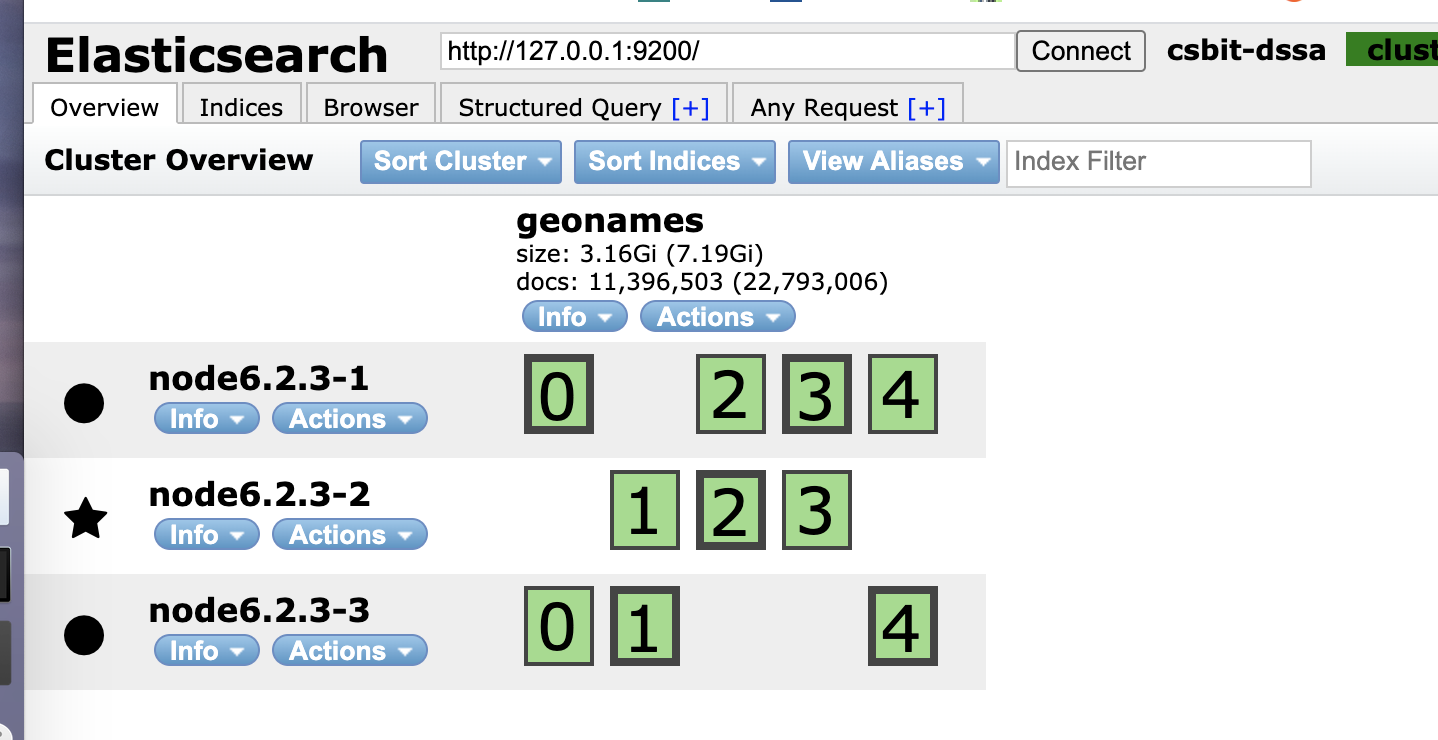
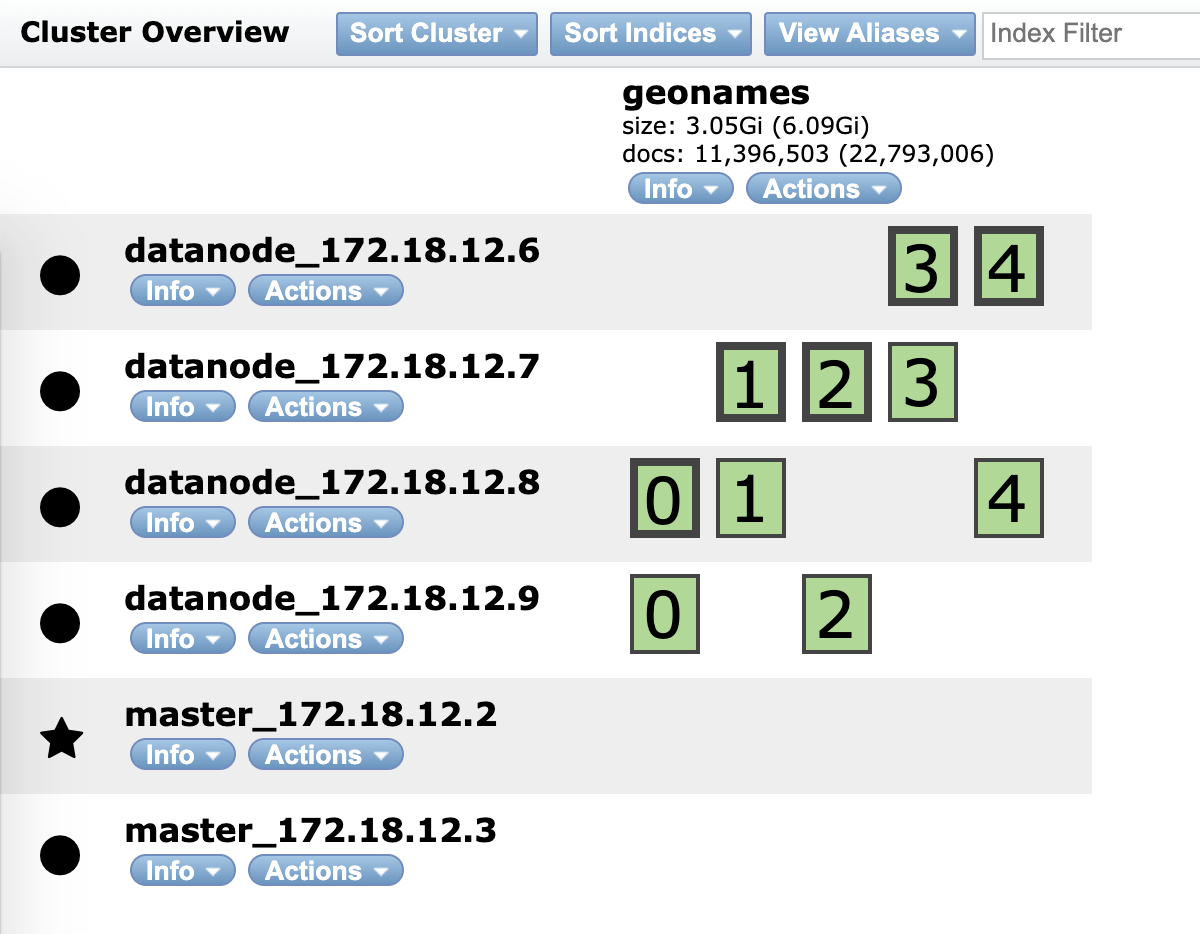
把es6.2.3的3节点数据分别拷贝到es7.4.1的3个data节点中。(为了避免cluster.uuid出现不一致,需先将新集群的data数据清空,然后先启动3个data节点,再启动master节点,观察es集群状态
再启动第4个data节点,观察es数据。然后停掉一个到多个data节点,观察es数据(es会自动重新分配数据的分配情况)
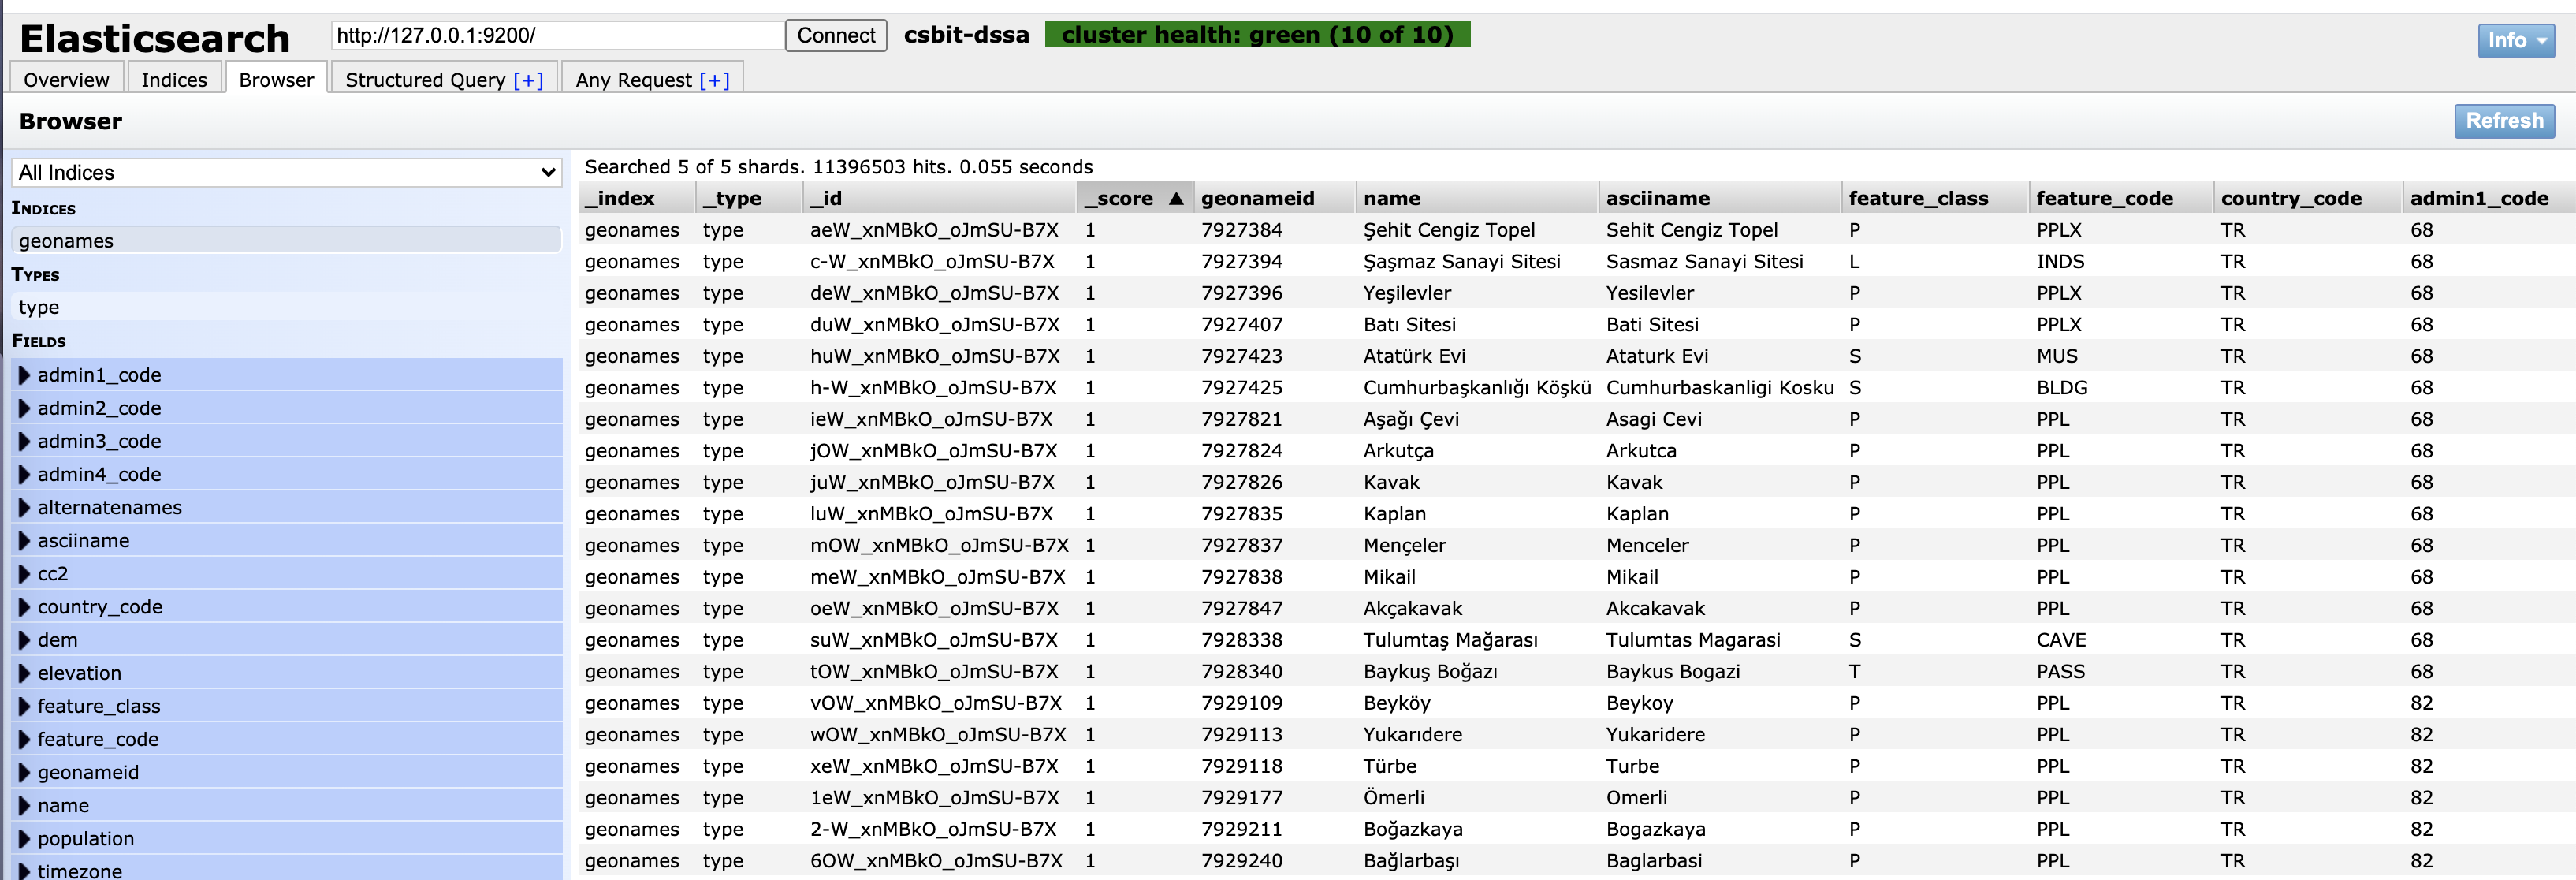
在启动一个master节点(模拟线上多个master的情况)
- 随机毒鸡汤:你早起,我晚起,我们早晚不在一起。